Creating a Game Pass in Roblox is a fantastic way to monetize your game and offer players special perks; polarservicecenter.net understands the importance of seamless experiences, and this guide will walk you through the process, ensuring your players enjoy every benefit. From setting up your game pass to understanding its analytics, we’ve got you covered, making it easy for you to enhance your game’s appeal and revenue using Roblox game pass creation. Dive in to learn about roblox pass creation, roblox developer monetization, and game promotion roblox.
Table of Contents
- Understanding Roblox Game Passes
- Creating a Roblox Game Pass: A Detailed Guide
- Getting the Pass ID: A Must for Scripting
- Methods to Sell Your Roblox Game Pass
- Assigning Privileges to Players with Game Passes
- Analyzing Your Game Pass Performance
- Troubleshooting Common Issues
- Advanced Tips for Maximizing Game Pass Revenue
- Leveraging polarservicecenter.net for Enhanced Support
- FAQ: Create Game Pass Roblox
1. Understanding Roblox Game Passes
What exactly is a Roblox Game Pass, and why should you consider creating one? A Roblox Game Pass is a virtual item that players can purchase with Robux, granting them special privileges or content within your game. These privileges can range from access to exclusive areas or items to permanent power-ups or cosmetic enhancements.
- What are Roblox Game Passes?
- Roblox Game Passes are virtual tickets or keys that provide access to special features within a game. They’re a way for developers to monetize their games by offering additional content or perks to players who are willing to spend Robux.
- Why Use Game Passes?
- Monetization: Game Passes provide a direct revenue stream for your game.
- Engagement: They encourage players to invest more deeply in your game by offering desirable perks.
- Customization: They allow you to offer a variety of benefits, catering to different player preferences and play styles.
- Game Passes vs. Developer Products
- Game Passes: Ideal for one-time purchases that grant permanent or long-lasting benefits, such as access to a VIP area or a powerful weapon.
- Developer Products: Best suited for items that players can purchase multiple times, such as in-game currency, potions, or temporary power-ups.
- Examples of Successful Game Passes
- Adopt Me!: VIP access to exclusive areas and faster egg hatching.
- MeepCity: Access to exclusive vehicles and house decorations.
- Brookhaven RP: Special character customization options and access to unique buildings.
2. Creating a Roblox Game Pass: A Detailed Guide
How do you actually create a Game Pass in Roblox? Here’s a step-by-step guide to get you started.
-
Prerequisites
- Ensure your game is published and accessible on Roblox. To publish, open Roblox Studio, navigate to “File,” then “Publish to Roblox.”
-
Access the Creation Dashboard
- Go to the Roblox Create page. This is your hub for managing all your creations, including games, assets, and passes.
-
Select Your Game
- Find your game from the list of creations. Click on its icon to access its specific settings and monetization options.
-
Navigate to the “Passes” Section
- In your game’s dashboard, go to “Monetization” and select “Passes.” This section is dedicated to creating and managing Game Passes for your game.
-
Create a New Pass
- Click the “Create a Pass” button. This will open the Game Pass creation interface where you can customize your pass.
-
Upload an Image
- Click the “Choose File” button to upload an image for your Game Pass icon. Make sure the image meets the following criteria:
- Dimensions: The image should not exceed 512×512 pixels.
- Content: Ensure important details are within the circular boundaries to avoid cropping issues.
- Format: The image should be in .jpg, .png, or .bmp format.
 Circular Trimming Bad
 - Click the “Choose File” button to upload an image for your Game Pass icon. Make sure the image meets the following criteria:
-
Name and Describe Your Pass
- Enter a descriptive name for your Game Pass in the “Name” field. This name should clearly communicate the benefit or privilege the pass provides.
- Write a concise description in the “Description” field. Explain what players will gain by purchasing this pass. This helps players understand the value of the pass.
-
Finalize Creation
- Click the “Create Pass” button to finalize the creation of your Game Pass.
-
Configure Sales Settings
- After creating the pass, it will initially be set as “Off Sale.” To make it available for purchase, you need to configure the sales settings.
- Click on the gear icon next to the pass and select “Configure.”
- Navigate to the “Sales” tab.
- Enable the “Item for Sale” toggle.
- Enter the price in Robux that you want to charge for the pass. The minimum price is 1 Robux, and the maximum price is 1 billion Robux.
- Click “Save Changes” to update the sales settings.
-
Test Your Pass
- Before fully launching your Game Pass, test it in your game to ensure it works as expected. Use a test account to purchase the pass and verify that the privileges are correctly assigned.
3. Getting the Pass ID: A Must for Scripting
Why is the Pass ID so important, and how do you get it? The Pass ID is essential for scripting and implementing the Game Pass functionality within your game.
-
Navigate to the “Passes” Section
- Go to the Roblox Create page, select your game, and navigate to “Monetization” then “Passes.”
-
Locate the Pass
- Find the Game Pass you want to get the ID for.
-
Copy the Asset ID
- Hover over the Game Pass thumbnail.
- Click the “…” button (More Options).
- Select “Copy Asset ID” from the context menu. The Asset ID is now copied to your clipboard.
4. Methods to Sell Your Roblox Game Pass
Where and how can you sell your Game Pass? There are two primary methods: inside your game and outside your game (on the experience details page).
Inside Your Experience
-
Using MarketplaceService
- The
MarketplaceServiceis your primary tool for selling Game Passes within your game. - You can use functions like
GetProductInfo()to retrieve information about the pass (name, price, description) andPromptPurchase()to initiate the purchase process.
- The
-
Get Product Information
- Use
GetProductInfo()to display the pass details within your game’s UI. This allows players to see what they are purchasing before committing.
local MarketplaceService = game:GetService("MarketplaceService") local productId = 000000 -- Replace with your pass ID local success, productInfo = pcall(function() return MarketplaceService:GetProductInfo(productId, Enum.InfoType.GamePass) end) if success and productInfo then if productInfo.IsForSale then print("Pass Name: " .. productInfo.Name) print("Price in Robux: " .. productInfo.PriceInRobux) print("Description: " .. productInfo.Description) else print("This product isn't for sale") end end - Use
-
Prompt Purchase
- Use
PromptPurchase()to prompt the purchase when a player interacts with a specific element in your game, such as clicking a button or talking to an NPC.
local MarketplaceService = game:GetService("MarketplaceService") local Players = game:GetService("Players") local passID = 0000000 -- Replace with your pass ID local function promptPurchase() local player = Players.LocalPlayer local hasPass = false local success, message = pcall(function() hasPass = MarketplaceService:UserOwnsGamePassAsync(player.UserId, passID) end) if not success then warn("Error while checking if player has pass: " .. tostring(message)) return end if hasPass then -- Show a message telling user they already own the pass else MarketplaceService:PromptGamePassPurchase(player, passID) end end - Use
-
Handle Purchase Completion
- Use
PromptGamePassPurchaseFinished()to handle the purchase completion. This allows you to assign the pass privileges to the player once the purchase is successful. Place this script insideServerScriptServiceto ensure the server handles the pass privileges.
local MarketplaceService = game:GetService("MarketplaceService") local passID = 0000000 -- Change this to your Pass ID local function onPromptPurchaseFinished(player, purchasedPassID, purchaseSuccess) if purchaseSuccess and purchasedPassID == passID then print(player.Name .. " purchased the Pass with ID " .. passID) -- Assign the user the ability or bonus related to the pass end end MarketplaceService.PromptGamePassPurchaseFinished:Connect(onPromptPurchaseFinished) - Use
Outside Your Experience
-
Store Tab on Experience Details Page
- You can also sell Game Passes directly from the Store tab on your experience details page.
- Go to the Roblox Create page, select your game, and navigate to “Monetization” then “Passes.”
-
Configure Sales Settings
- Hover over the pass and click the “…” menu.
- Select “Configure.”
- Navigate to the “Sales” tab.
- Enable the “Item for Sale” toggle.
- Enter the price in Robux.
- Click “Save Changes.”
-
Visibility
- The pass will then appear in the Store tab of your experience details page, allowing players to purchase it directly from there.
5. Assigning Privileges to Players with Game Passes
How do you ensure players receive the benefits they’ve paid for? You must manually assign pass privileges to users that purchase your passes.
-
Using PlayerAdded Event
- Use the
PlayerAddedevent to check if a user already owns the pass when they join the game.
- Use the
-
Check Ownership
- When a player joins, use
MarketplaceService:UserOwnsGamePassAsync()to verify if they own the pass.
local MarketplaceService = game:GetService("MarketplaceService") local Players = game:GetService("Players") local passID = 0000000 local function onPlayerAdded(player) local hasPass = false local success, message = pcall(function() hasPass = MarketplaceService:UserOwnsGamePassAsync(player.UserId, passID) end) if not success then warn("Error while checking if player has pass: " .. tostring(message)) return end if hasPass then print(player.Name .. " owns the Pass with ID " .. passID) -- Assign user the ability or bonus related to the pass end end Players.PlayerAdded:Connect(onPlayerAdded) - When a player joins, use
-
Assign Privileges
- If the player owns the pass, grant them the appropriate privileges, such as access to a VIP area, a special item, or a permanent power-up.
6. Analyzing Your Game Pass Performance
How can you track the success of your Game Passes? Roblox provides analytics tools to help you monitor the performance of your passes.
-
Access Pass Analytics
- Go to the Roblox Create page, select your game, and navigate to “Monetization” then “Passes.”
- Select the “Analytics” tab.
-
View Key Metrics
- Top Passes: See which of your passes are performing the best.
- Sales and Net Revenue: Analyze overall sales and net revenue over a selected time period.
- Catalog Monitoring: Sort items by sales and net revenue to identify trends.
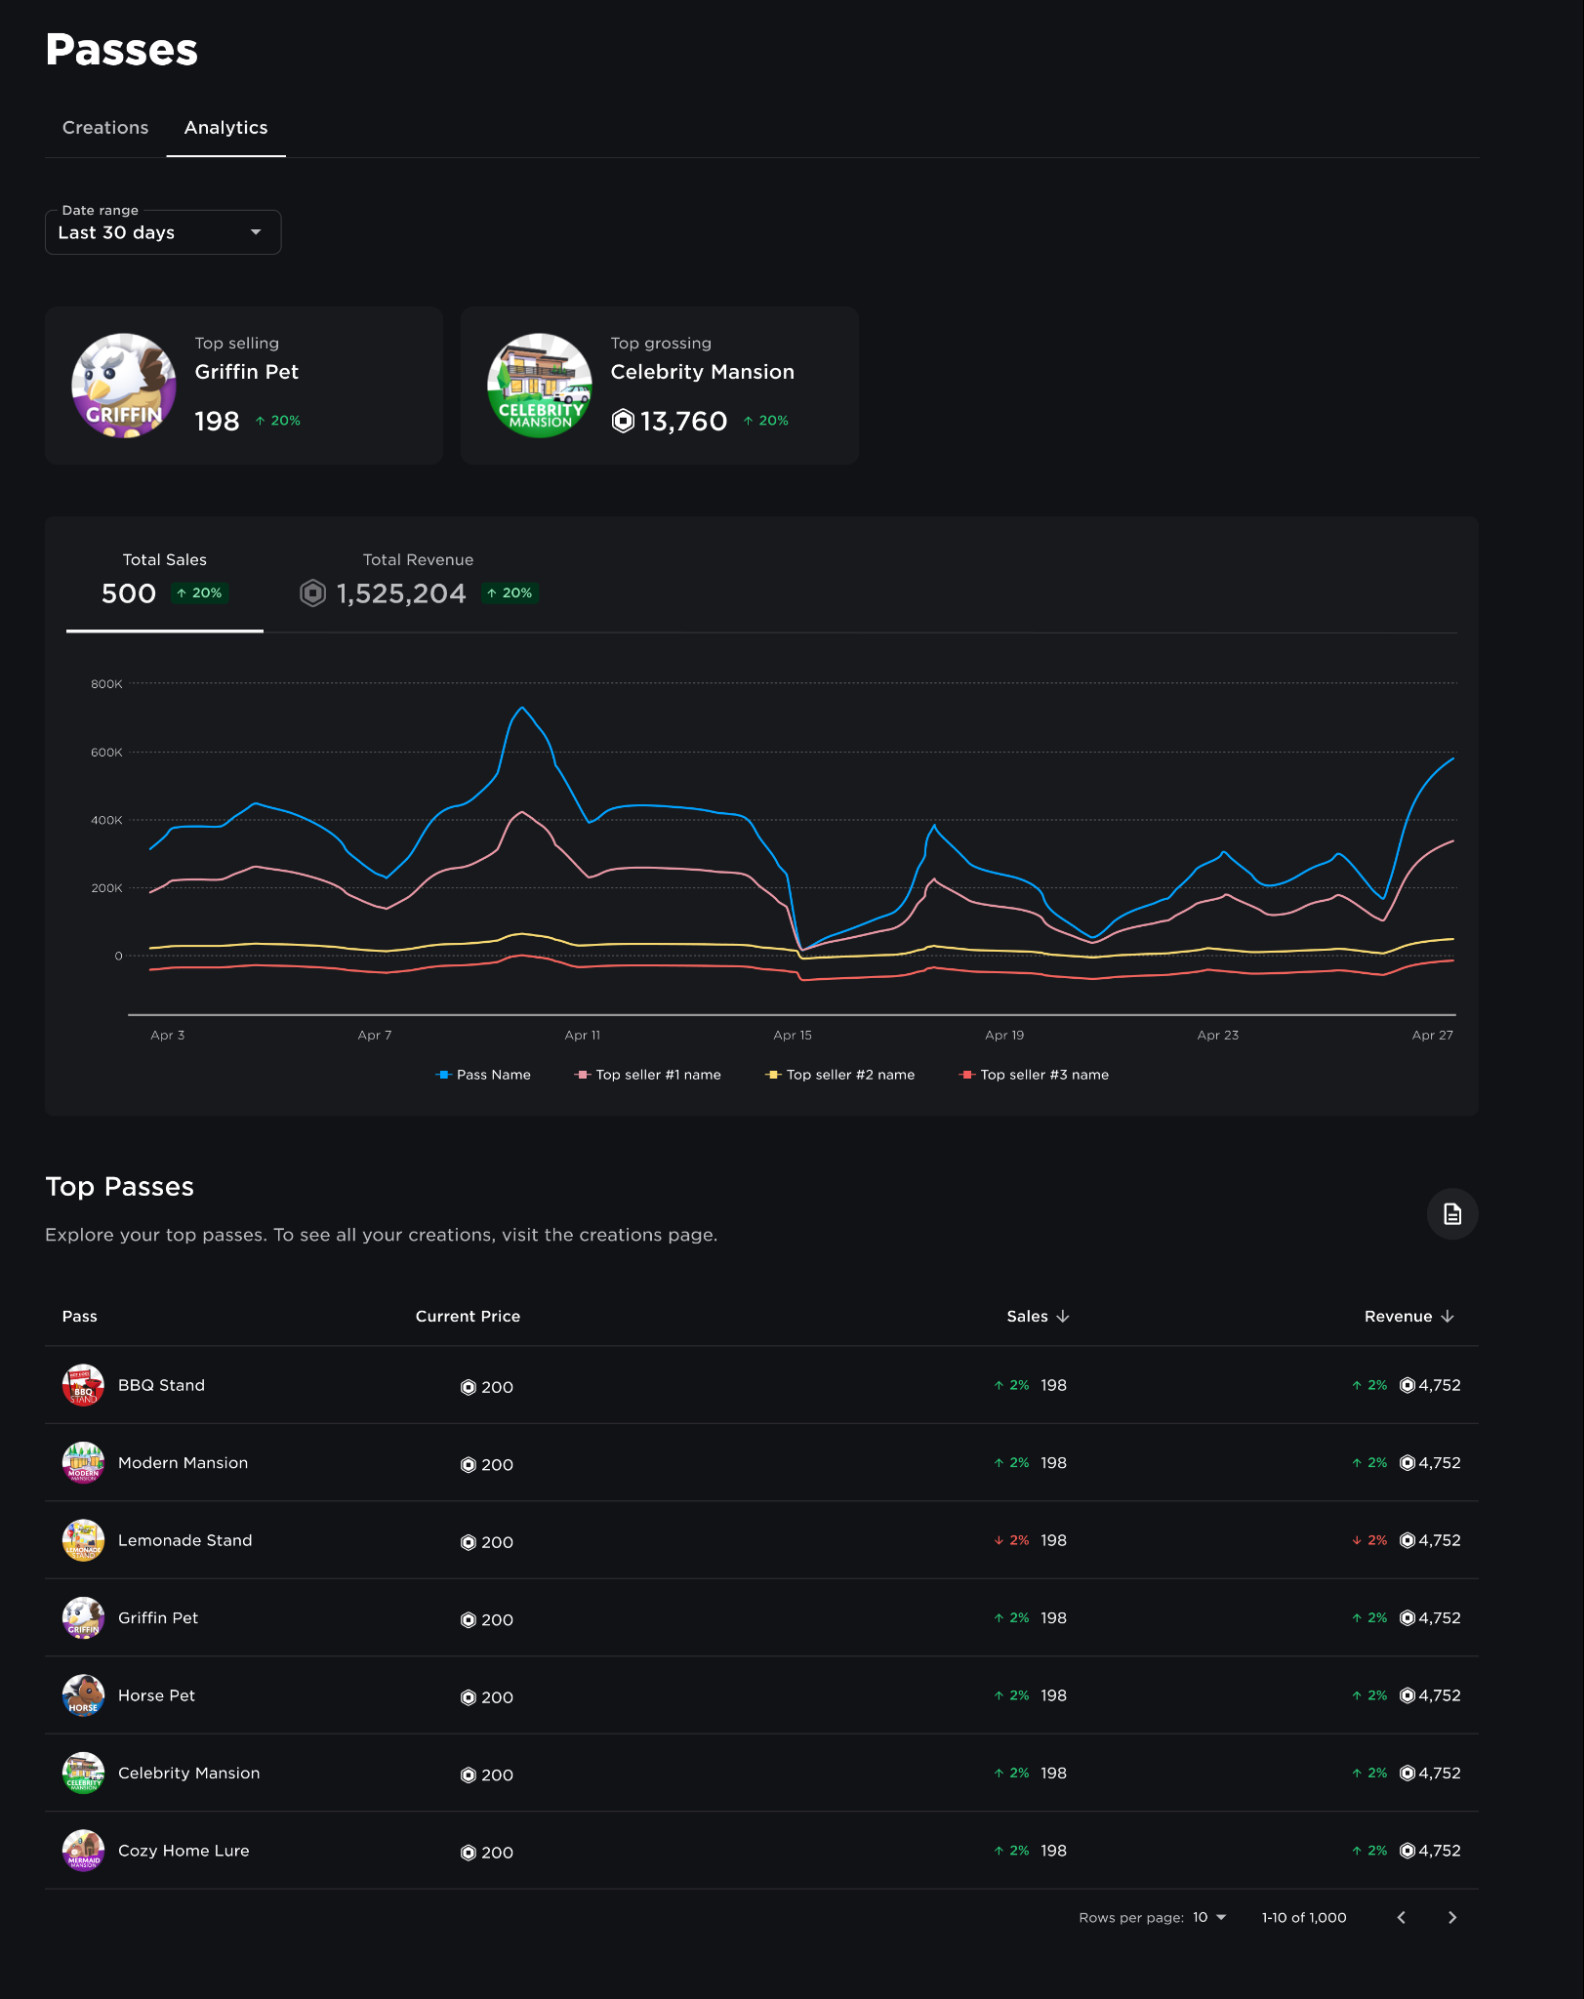 Passes Analytics 2
7. Troubleshooting Common Issues
What should you do if something goes wrong? Here are some common issues and their solutions.
-
Pass Not Appearing for Sale
- Issue: The Game Pass is not showing up in the Store tab or within your game.
- Solution:
- Ensure the “Item for Sale” toggle is enabled in the Sales settings.
- Double-check the price to make sure it is within the acceptable range (1 to 1 billion Robux).
- Verify that the game is published and accessible.
-
Players Not Receiving Privileges
- Issue: Players who purchase the Game Pass are not receiving the associated benefits.
- Solution:
- Check your scripting to ensure the
UserOwnsGamePassAsync()function is correctly implemented. - Verify that the Pass ID in your script matches the actual Pass ID.
- Make sure the privilege assignment logic is executed on the server (inside
ServerScriptService).
- Check your scripting to ensure the
-
Image Upload Issues
- Issue: Unable to upload an image for the Game Pass icon.
- Solution:
- Ensure the image dimensions do not exceed 512×512 pixels.
- Verify that the image format is .jpg, .png, or .bmp.
- Check your internet connection and try again.
-
Error Messages in Script
- Issue: Script errors related to
MarketplaceServicefunctions. - Solution:
- Review the script for typos or incorrect function calls.
- Use
pcall()to handle potential errors and provide informative warnings. - Consult the Roblox API documentation for the correct usage of
MarketplaceServicefunctions.
- Issue: Script errors related to
-
Pass Purchase Failure
- Issue: Players are unable to purchase the Game Pass.
- Solution:
- Ensure the player has enough Robux in their account.
- Check if there are any Roblox outages or service disruptions.
- Verify that the Game Pass is correctly configured for sale.
8. Advanced Tips for Maximizing Game Pass Revenue
How can you optimize your Game Pass strategy to increase revenue? Here are some advanced tips.
-
Offer Valuable and Unique Perks
- Make sure the benefits offered by your Game Pass are desirable and worth the price. Exclusive items, areas, or abilities can entice players to purchase.
-
Bundle Game Passes
- Create bundles that offer multiple Game Passes at a discounted price. This can encourage players to purchase more at once.
-
Dynamic Pricing
- Consider using dynamic pricing based on player engagement or in-game events. Offering temporary discounts or promotions can boost sales.
-
Promote Your Game Passes
- Use in-game notifications, social media, and community forums to promote your Game Passes. Highlight the benefits and create a sense of urgency.
-
Monitor Analytics and Adjust
- Continuously monitor the performance of your Game Passes using Roblox analytics. Adjust pricing, perks, or marketing strategies based on the data.
-
Engage with Your Community
- Solicit feedback from your players about what they would like to see in Game Passes. This can help you create passes that are highly desirable and successful.
-
Seasonal and Event-Based Passes
- Create Game Passes that are tied to seasonal events or in-game updates. These can offer limited-time benefits or exclusive items that add excitement and encourage purchases.
-
Tiered Game Passes
- Offer different tiers of Game Passes with varying levels of benefits. This allows players to choose the option that best fits their budget and play style.
-
Collaborate with Other Developers
- Partner with other developers to cross-promote each other’s Game Passes. This can help you reach a wider audience and increase sales.
-
Optimize Game Pass Icons and Descriptions
- Use high-quality images and compelling descriptions to make your Game Passes stand out. Clearly communicate the benefits and value of each pass.
9. Leveraging polarservicecenter.net for Enhanced Support
Why turn to polarservicecenter.net for your Roblox support needs? polarservicecenter.net is your go-to resource for troubleshooting, warranty information, and expert advice on all things Polar.
- Troubleshooting Assistance: Access a comprehensive knowledge base to resolve common issues with your Polar devices.
- Warranty Information: Understand your warranty coverage and how to claim it.
- Service Center Locator: Find authorized service centers in the USA for professional repairs. Our address is 2902 Bluff St, Boulder, CO 80301, United States, and our phone number is +1 (303) 492-7080. You can also visit our website at polarservicecenter.net.
- Expert Support: Connect with knowledgeable technicians for personalized assistance.
For any technical issues or warranty questions, don’t hesitate to reach out to polarservicecenter.net for reliable support.
10. FAQ: Create Game Pass Roblox
- What is a Roblox Game Pass?
- A Roblox Game Pass is a virtual item that players can purchase to gain special privileges or content within a Roblox game.
- How do I create a Game Pass in Roblox?
- Go to the Roblox Create page, select your game, navigate to “Monetization” then “Passes,” and click “Create a Pass.” Upload an image, name it, describe it, and configure the sales settings.
- What is the difference between a Game Pass and a Developer Product?
- Game Passes are for one-time purchases that grant permanent benefits, while Developer Products are for items players can purchase multiple times.
- How do I find the Pass ID for my Game Pass?
- Go to the Roblox Create page, select your game, navigate to “Monetization” then “Passes,” hover over the pass, click the “…” button, and select “Copy Asset ID.”
- How do I sell a Game Pass inside my Roblox game?
- Use the
MarketplaceServiceto retrieve product information withGetProductInfo()and prompt the purchase withPromptPurchase().
- Use the
- How do I sell a Game Pass outside my Roblox game?
- Configure the sales settings for the pass on the Roblox Create page, under “Monetization” then “Passes,” and enable “Item for Sale.” It will then appear on your game’s Store tab.
- How do I assign privileges to players who purchase my Game Pass?
- Use the
PlayerAddedevent to check if a user owns the pass withUserOwnsGamePassAsync()and grant them the appropriate privileges.
- Use the
- How can I track the performance of my Game Passes?
- Go to the Roblox Create page, select your game, navigate to “Monetization” then “Passes,” and select the “Analytics” tab to view key metrics.
- What should I do if players are not receiving the benefits of their Game Pass?
- Check your scripting, verify the Pass ID, and ensure the privilege assignment logic is executed on the server (inside
ServerScriptService).
- Check your scripting, verify the Pass ID, and ensure the privilege assignment logic is executed on the server (inside
- What are some tips for maximizing Game Pass revenue?
- Offer valuable and unique perks, bundle Game Passes, use dynamic pricing, promote your Game Passes, monitor analytics, and engage with your community.
By following this comprehensive guide, you’ll be well-equipped to create, manage, and optimize your Roblox Game Passes, enhancing your game and boosting your revenue. And remember, for all your Polar product support needs, polarservicecenter.net is here to help!